Building a website is fun. There’s creativity and freedom involved, and putting a site out in the world gives a sense of fulfillment. With WordPress, you’ve got an easy and straightforward way to create a professional website without spending money on costly design agencies.
With a few easy steps, you can build your own site. This guide goes into detail about how you can create a website with WordPress.
We will start with registering a domain and installing WordPress. We will end with a fully functioning website including a theme and plugins.
Looking for info about what WordPress is first? This guide walks you through the fundamentals and explains why you should use it.
To create a website with WordPress, you need to take the following steps:
- Find the right domain name and hosting provider
This allows visitors to access your website on your desired URL.
- Install WordPress on your hosting
The core functionality of WordPress is needed to build your website.
- Make a plan of action
Keep a distinct branding and site plan in mind to set yourself up for success.
- Pick the right theme
A theme kickstarts your site with a visual language and extra functionality.
- Create pages and posts
Build thoughtful content and design for your visitors.
- Improve your website with essential plugins
The right plugins will add great functionality and improvements to your site.
- Share your website with the world
Attract visitors with a few easy tricks.
- Keep on improving
Tweak your website and make it a valuable place to visit.
Let’s get started!
Step 1: Find the right domain name and hosting provider
The first thing we need to do is register a domain name and find a hosting provider. This hosting provider will host our WordPress website.
You might have done a Google search on “WordPress” already, which offers you two options:
- WordPress.org
- WordPress.com
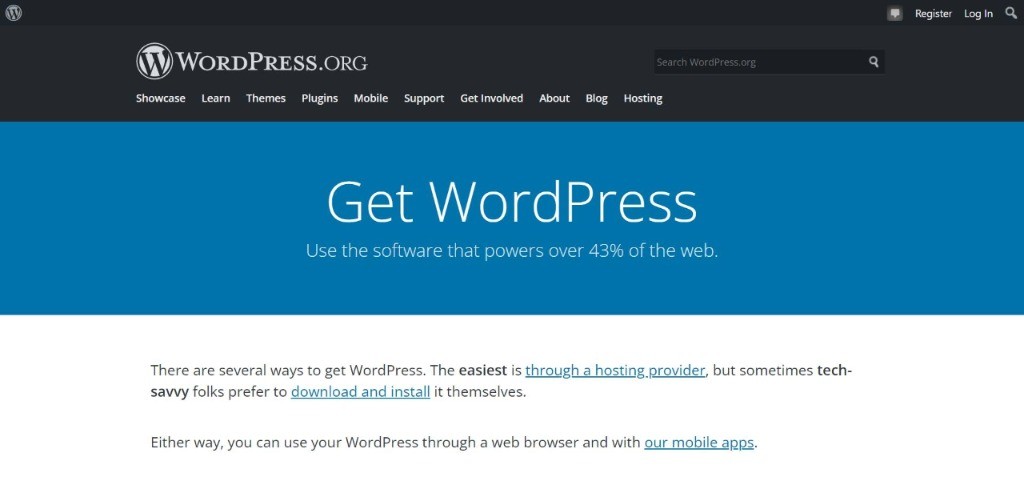
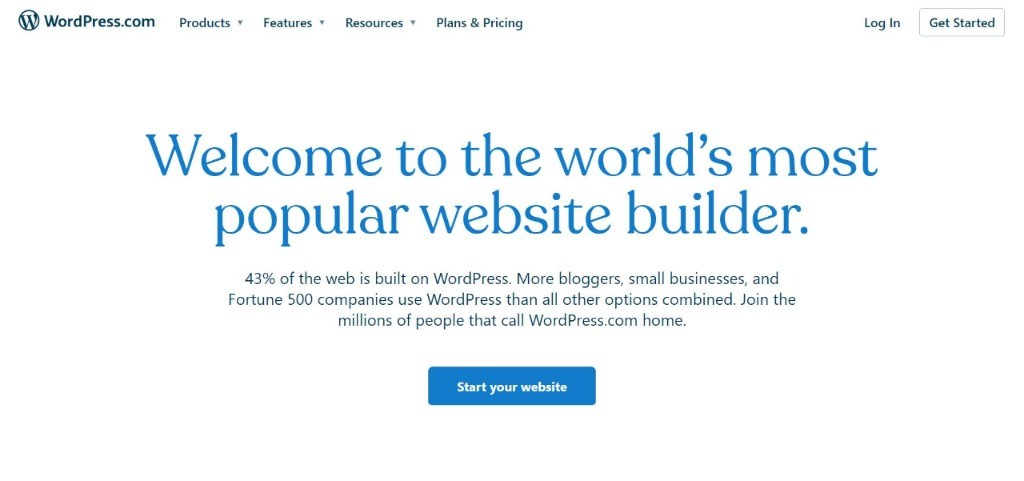
They aren’t the same, which can cause some confusion. The first one (.org) is what we need.
The key difference between both options is who is actually hosting your website.
- WordPress.org is self-hosted. This is the WordPress software, owned by the non-profit WordPress Foundation. On wordpress.org, you can download the open-source WordPress software for free.
- WordPress.com is a hosting service. This is an actual web hosting provider that offers WordPress software but in a stripped-down version and in a closed hosting environment.
To get the most flexibility for your site, we’d recommend going with wordpress.org. This means you have to choose a host for WordPress yourself. Why?
- You have more control over your website in the long run. WordPress.org is a fully open-source software package without limitations. WordPress.com offers the same software but strips it to limited features and adds hosting to it.
- WordPress.com’s hosting requires you to agree to their service-level agreements and restrictions. There are, for instance, limitations around how you may use your website commercially.
- WordPress.com offers a nice free hosted plan, but you can’t install plugins or even have your own domain name. To get rid of these limitations, you need a costly Business plan.
Our suggestion: In most scenarios, but especially if you want full control over your site without any restrictions, you have to go with wordpress.org. The rest of this guide is based on the choice for wordpress.org and to-be-decided hosting provider.
Choose a domain name
Before you can create your WordPress website, you need to pick a domain name. This is the URL that visitors use to access your website.
A domain name consists of two parts: the name and the extension. For example, in designforwp.com, designforwp is the name and the extension is .com.
Name: You are completely free to choose whatever name you want. Please note that it can only have letters (A-Z), digits (0-9), and hyphens (-).
Extension: For the extension, you are limited to a fixed list, but within these, you can choose whatever you want. The most common extension is .com, which is mainly used for internationally-operating websites. There are also country-specific extensions, such as .nl for Dutch websites or .de for German websites. There are several other extensions too, such as .net, .online, or .game.
For everyday businesses, we recommend either country-specific extensions or .com.
Your name and extension combined are your final domain name. This should be unique. There are many websites out there, so you need to check upfront if your desired domain name is available. You can use websites from hosting providers, such as SiteGround, to do a quick check.
Is your desired domain name available? Congratulations. It’s time to move on to the next step!
Choose a hosting provider
Now you have settled on a domain name, you can pick your hosting provider. A hosting provider registers the domain name for you and rents out server capacity to which you can upload your website files.
You are the owner of the domain name, but the hosting provider is the intermediary party.
You basically buy two things from a hosting provider:
- Registration of a domain name (10 to 15 euros or dollars a year)
- Hosting space on a server (5 euros or dollars a month or more, depending on your needs)
It is important to choose a good hosting provider with a proper hosting plan.
With cheap, low-budget hosting, you usually rent a small part of a server, shared with others. This is fine for smaller websites that don’t require much capacity, and you might miss out on extra features, such as your own email account.
If you have a resource-heavy website, such as a webshop or a website with lots of video content, you should go for more expensive hosting.
Another aspect to consider is the physical location of your hosting provider’s servers. Generally speaking, if you are building a website for Italian visitors it is best to choose a hosting provider that has servers located in Italy. Your website will load quicker if the server is located closer to your audience.
Other important factors in picking a hosting provider are:
- Reputation: Does the provider get high reviews?
- Support: Do they offer quality support with quick response times?
- Uptime: Do they guarantee website uptime above 99%?
- Offering: Do they offer plans and features that your website needs?
Overall, it is important to find a provider with the right balance between quality and costs.
There are tons of hosting providers available. Many of them offer specific WordPress hosting too. This is a hosting plan specifically optimized for WordPress websites.
Compare hosting providers: view our hosting guide.
Want our best advice? We’d recommend you go with SiteGround.
In short, SiteGround:
- is a by WordPress.org-recommended web host
- has been a trustworthy name in the web hosting industry
- offers great performance and support, as well as daily back-ups, SSL, and more
- has WordPress-optimized servers located all over the world
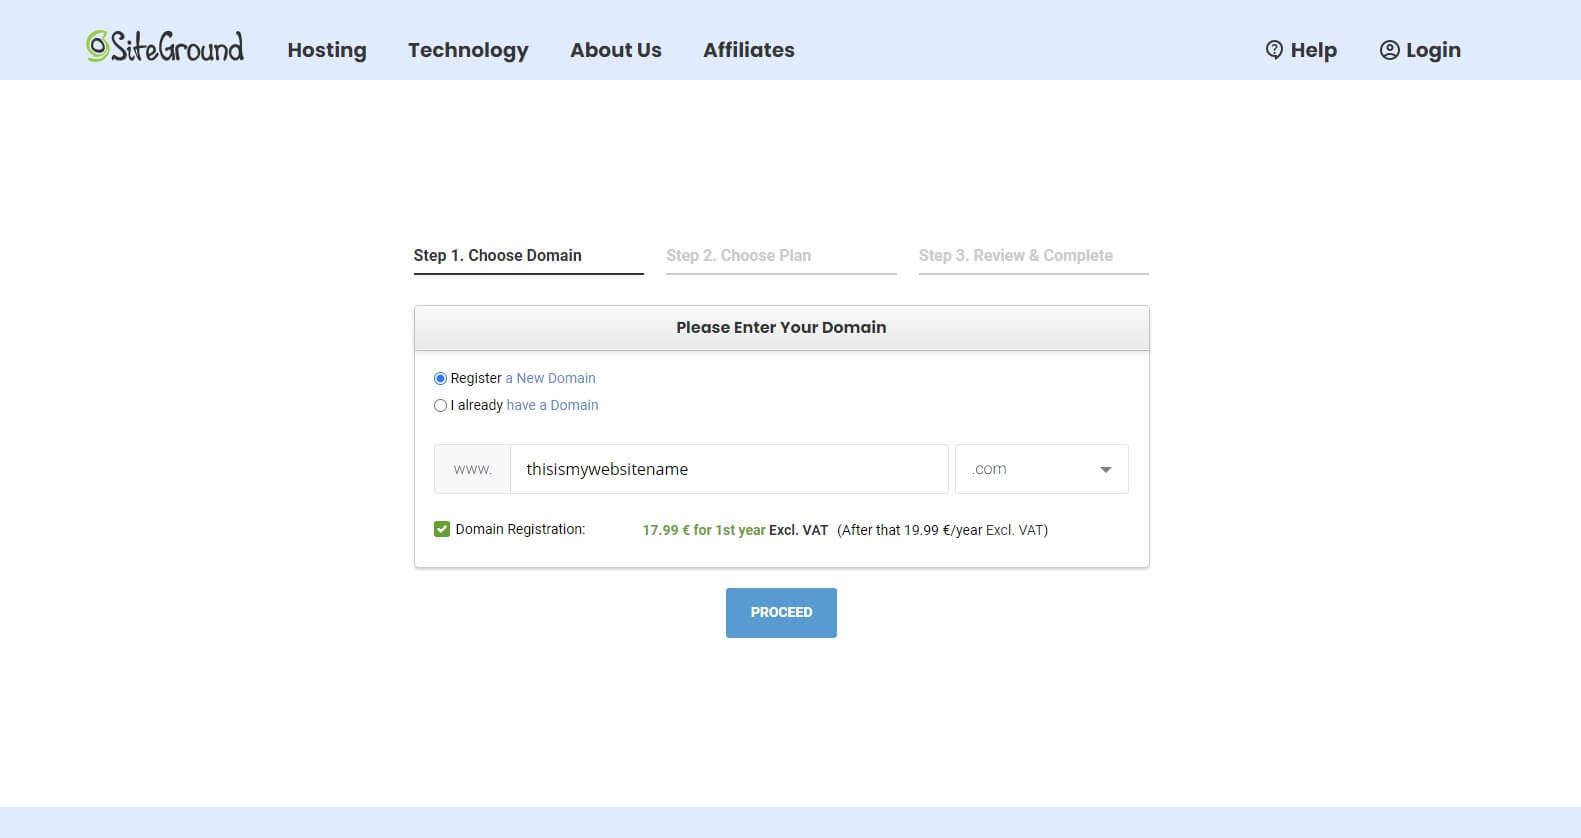
Go to www.siteground.com. Under Hosting, select ‘WordPress Hosting’. You are offered multiple plans. The smallest plan, StartUp, is sufficient for most new websites. Click on ‘Get Plan’.
On the next page, enter your desired domain name and choose the extension. Click ‘Proceed’ and make sure your requested domain name is available for registration.
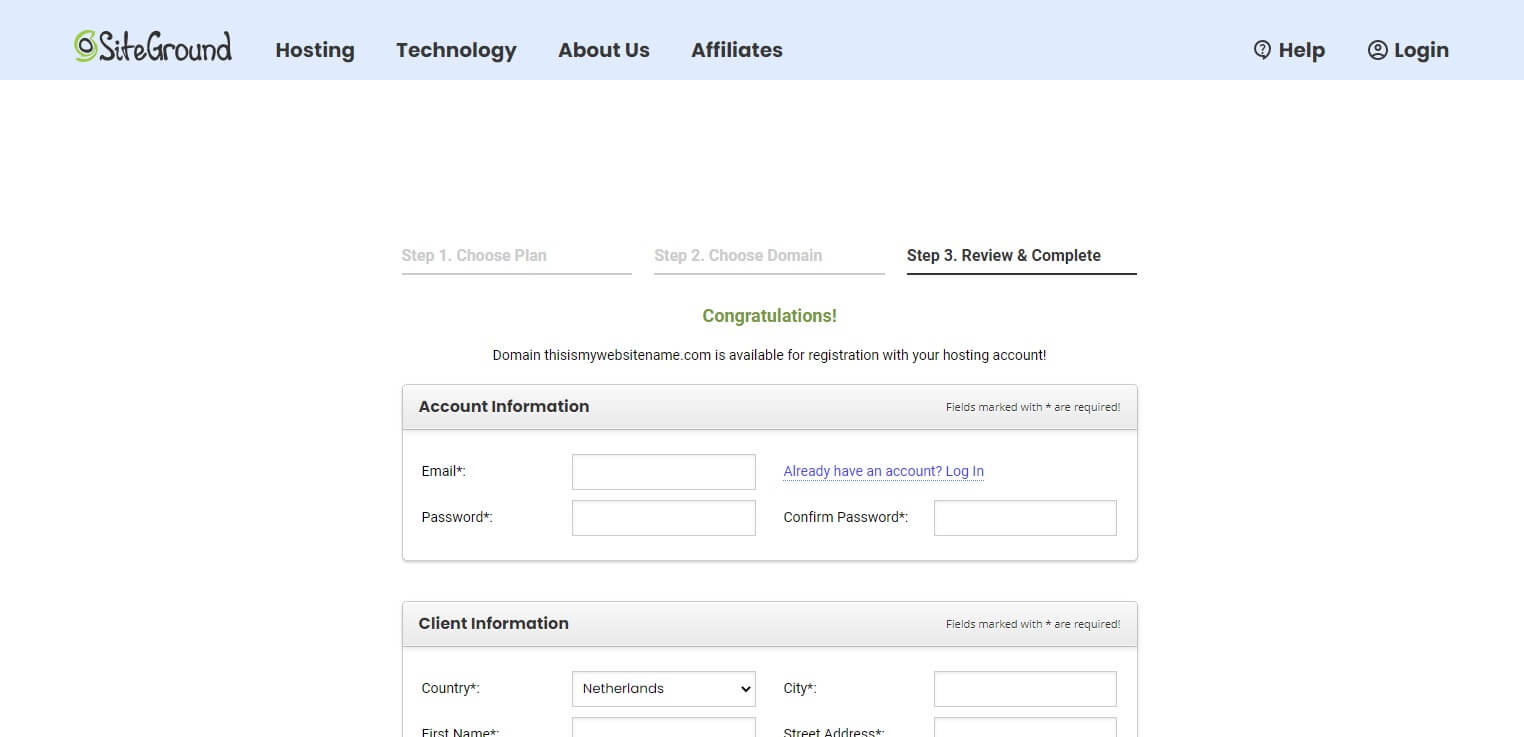
Fill in your account- and payment information. Under Purchase Information, you have the opportunity to select a Data Center. Select a location closest to where you expect most of your visitors to be. Don’t worry, you can change this later at any time. Finally, hit the ‘Pay now’ button and finish the domain registration.
Congratulations, you are now the owner of your own domain name! 🥳
SiteGround will send you a confirmation email with login details for their hosting environment. You might also be asked to click a link to verify that you are the owner of the domain name.
Step 2: Install WordPress on your hosting
After you have bought your domain, you can access your provider’s customer area (also called: the control panel). In this area, you can manage settings, create email accounts, and install software such as WordPress.
There are two ways to install WordPress on your server: manually and automatically.
Manual installation: Manual installation is usually recommended because it gives you more control over the installation process. However, you need technical knowledge compared to an automated installation. FTP and MySQL databases should sound familiar to you. That can be quite intimidating for beginners. It’s up to you if you feel comfortable with it. If so, you can find installation instructions on the SiteGround.com website.
Automated installation: Do you consider yourself a beginner? Then the automated installation offered by your hosting provider should absolutely be sufficient. With a few easy clicks, your provider will automatically install WordPress for you. After that, you are ready to go.
For this guide, we’ll assume you want an automated installation on SiteGround.
Make sure you are signed in to SiteGround’s Customer Area. In the top navigation bar, select Websites. Under ‘Website Details’ you will see your website. Click the ‘Site Tools’ button.
In this area, you will manage the settings for the selected domain. On the left side, click WordPress and then ‘Install & Manage’. Click ‘Select’ on the left side under the WordPress logo. Leave the Application Setup as it is, but disable the checkbox next to ‘Install with WordPress Starter’. This would install a default plugin on your website, which we don’t need for now. We prefer to install WordPress as clean and fresh as possible.
Under Admin info, you will create your administration account for WordPress. This is the account that we will use to sign in to the back end of our WordPress website. Enter a username (such as your first name), email address, and a secure password. That’s it. Leave the checkboxes unchecked and press Install. Wait a few moments while SiteGround is installing WordPress.
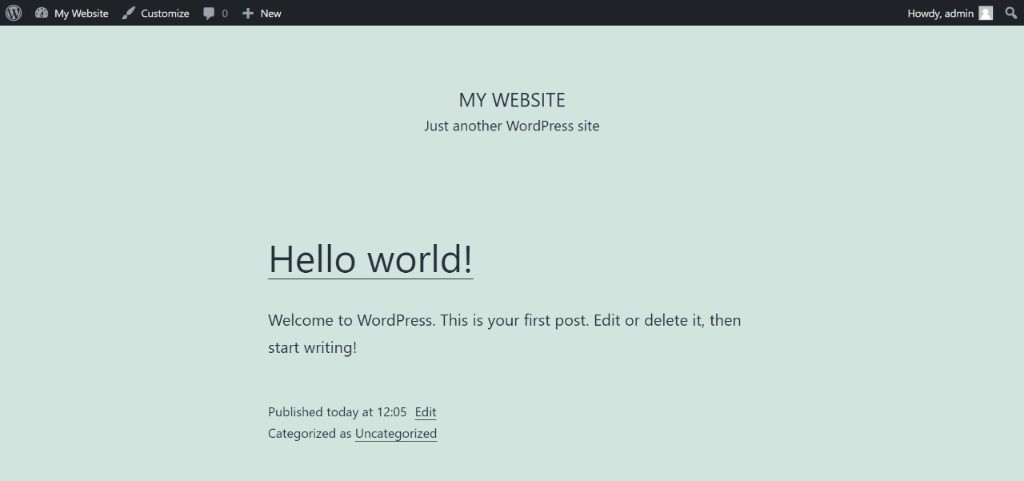
WordPress has now been installed on your server!
You will be offered two options: the Admin Panel and View Site.
First, click View Site. You will now see your site live!
Do you get an error message about your connection not being private? This might happen with some new websites and it has to do with your SSL (https) certificate. Back in SiteGround’s Site Tools area, click Security -> SSL Manager in the sidebar. Select your domain, and under ‘Select SSL’ select ‘Let’s Encrypt’. Press Get. Now, in the sidebar, go to ‘HTTPS Enforce’ and enable the ‘HTTPS Enforce’ option for your website. Wait a few minutes and your website should now work correctly!
Your brand-new website will look something like this:
The other option was ‘Admin Panel’. Through that button, you can access the WordPress administration area: it’s the back end of your site. However, of course, you don’t want to always go to the SiteGround website first to access your back end. Luckily, you can access this at any time by adding /wp-admin to your URL (so it will become www.mywebsite.com/wp-admin). Fill in the username and password that you created during the WordPress installation. You’ve now entered the admin area where the magic happens! By clicking your website title at the top left, next to the house icon, you can toggle between your live website and your admin area.
Is this your first time ever in the WordPress admin area? You can read our starters guide to find your way around and understand the basics of pages, posts, themes and plugins.
Before we move to the next step, let’s take a quick look at two pages in the admin area: the Plugins page and the Settings page.

The Plugins page shows all active plugins on your website. We will dive deeper into plugins later in this guide. For now, quickly go to Plugins. You might see a couple of plugins installed by default. Except for the ‘SG Optimizer’ plugin that is installed automatically for SiteGround users, other plugins are not necessary for now. We prefer a clean and fresh environment to start with. So, if you see any other plugins, you can delete those by clicking ‘Delete’.
The Settings page defines the global settings of your site. Go to Settings. You will end up on the General Settings page. Make sure that your Site Title and Tagline are according to your wishes. Also check the timezone, date format, and time format. Click ‘Save Changes’.
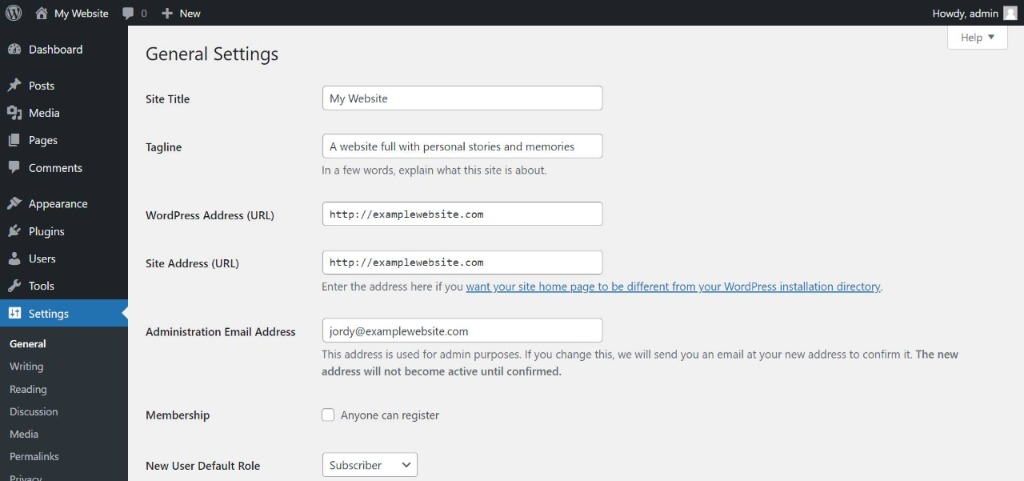
On the left side, go to Reading Settings. Make sure that ‘Excerpt’ is enabled for the ‘For each post in a feed, include’ option.
Finally, go to Permalinks Settings. These settings define the default URL’s that will be generated across your website. For example, if you will publish a post called ‘My new post’, the URL to this post can be like this:
- URL with id:
http://examplewebsite.com/?p=109 - URL with name:
http://examplewebsite.com/my-new-post - URL with prefix and name:
http://examplewebsite.com/blog/my-new-post - URL with date and name:
http://examplewebsite.com/2022/01/05/my-new-post
The first one feels very robotic. We don’t want to show random numbers in our URL. The last one feels too long. Personally, we like the second option: the URL with just the post name in it, but it’s up to you. Select an option in the settings (in our case: ‘Post name’) and click ‘Save Changes’.
Step 3: Make a plan of action
You have registered your domain name and installed WordPress on your server. In fact, you already have your website live.
It is very tempting to now immediately start building out your WordPress website. However, we strongly recommend you take a step back first.
Ideally, you’ll build a plan of attack. This will speed up the process of creating your website. It gives a better direction in the next steps.
Think about how you want your website to look and feel. Get a notebook and go through the following three steps:
- Pages and flow
- Logo & colors
- Global design
A. Define pages and flow
Make a list of the different features and pages that you ideally want to have on your website. This will help you in the next steps. Think globally about your wishes and write them down.
- How do you want your homepage to look? What info do you want to show?
- Do you want a services or products page? What should it roughly look like?
- Do you want a contact page? Should there be a contact form?
- Do you want an about us page?
- Do you want a blog or news page?
- Are there any other pages or specific features you want?
- Do you have specific wishes around content or photos?
Look at other websites around the internet to get inspiration. Don’t be too perfectionistic. You don’t need a finalized plan, but having a rough concept on paper helps massively.
B. Define logo & colors
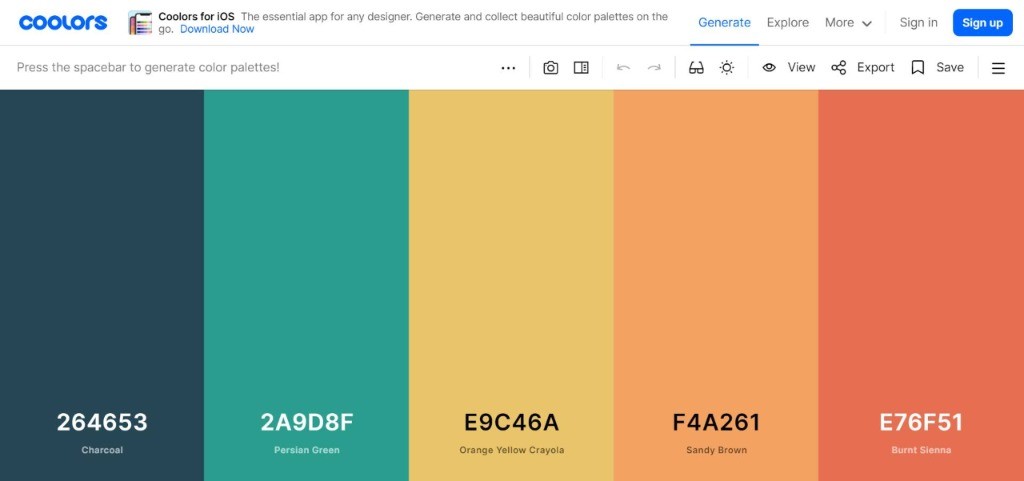
This is the moment to think about the visual identity of your website too. Maybe you already have a logo and branding colors. If not, make sure you have an idea. If you know what style your website should convey, you will make it easier to choose the right theme and design the right pages in the next steps.
If you need help generating a nice color palette, we recommend taking a look at coolors.co. On this website, you can find pretty color palettes or you can generate your own.
C. Define global design
In this final step, it is time to think about the overall style of your website. Maybe there are a few websites that really inspire you. Or maybe you have a clear idea of how a page should look like. The more you know, the easier it will be in the next steps to build up your pages. You can even make rough sketches if you would like.
No idea yet? Don’t worry. Let’s move on to the next step!
Step 4: Pick the right theme
You have all the basics ready for your website. Now it is time to pick a theme.
A theme is a kickstarter for your website. It is a global template, and often contains a set of plugins to add functionality to the WordPress core as well. Themes set restrictions for your site. Although most themes are very flexible, they impact your website with an overall look and feel.
There are many available themes out there, either free or paid. Free themes look great, but they are limited in options and customizations. For example, it is more difficult to change the color of specific components or adjust the font styles exactly how you wish. Paid themes often include nice, extra features such as drag-and-drop page builders, but they are more complex to manage and you need more knowledge to get them up and running.
Choosing a free or paid theme is up to you. Paid themes are usually between 50 and 60 euros or dollars. They are often great and we would recommend those for bigger website projects. However, if you have a smaller website and not many specific requirements, a free theme is sufficient.
Buy a premium theme: Premium themes are usually bought from a third-party marketplace. The most popular marketplace is called ThemeForest. Make sure you have selected the WordPress category. Browse through the available themes and check the previews until you find something you like. After buying the theme, you will get a download link. Download the file, sign in to your WordPress dashboard, and go to Appearance -> Themes -> Add New -> Upload Theme. Select your installable theme file and press ‘Install’. Then, press ‘Activate’.
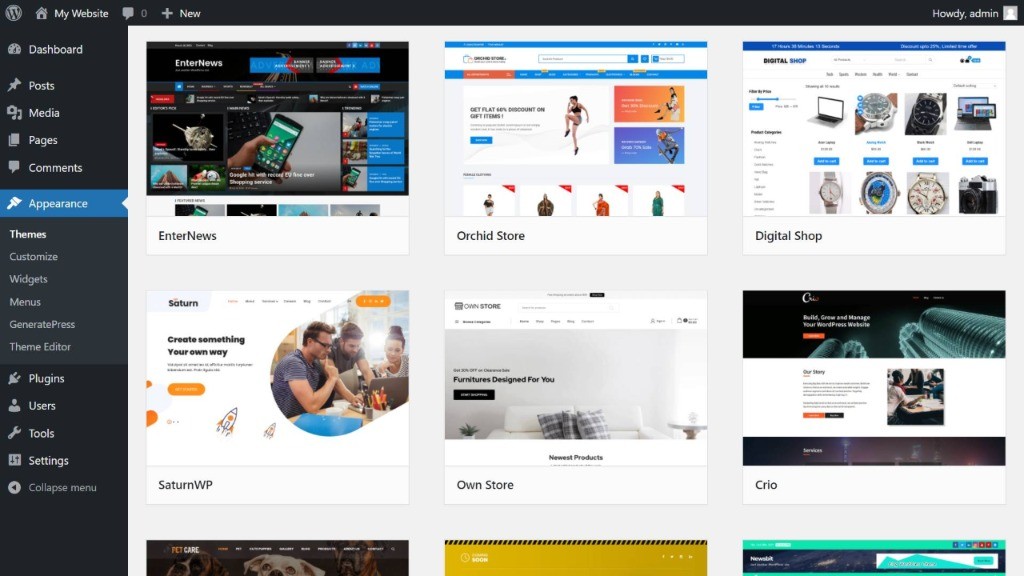
Choose a free theme: Free themes can be installed from within WordPress. Sign in to your WordPress dashboard and go to Appearance -> Themes -> Add New. Find a thema you like. You can preview a theme by clicking the ‘Preview’ button. However, because you haven’t created any pages yet, the preview looks different than you might expect. This will change when you will build your first page. If you find a theme that you like, press ‘Install’ and then ‘Activate’.
Themes are often specialized and created with a specific goal in mind. In the screenshot below, the EnterNews theme seems to be focused on news or blog websites, based on the image and the name of the theme. The Orchid Store, on the other hand, seems to be a webshop theme, whereas SaturnWP looks more corporate. By using the Feature Filter at the top, you can filter themes by subject.
Choose a theme that you like. Look at the overall design, the structure of the menu, and the page layout. You can often customize colors and typography in your theme after installation, but a theme gives you an overall look and feel of what you can expect. Also, make sure your theme ranks 4.5 stars or higher. We really discourage you to choose themes with a lower rating because they have those for a reason.
And remember, you can switch themes any time if you’re not happy.
Tweak your theme
Choose the theme you like and activate it. Depending on the chosen theme, you can customize and tweak it with dedicated theme options provided by the theme. Think about typography styles and sizes, colors, default page layouts, et cetera. Some themes offer lots of customizations, while others don’t.
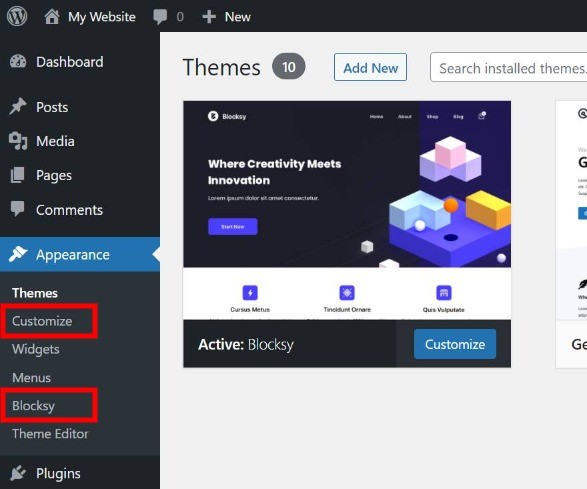
You will find those options in a new area in your WordPress admin. Every theme works slightly differently, but you can usually find this under either a new menu option in the sidebar (common among premium themes) or under Appearance -> Customize (common among free themes).
Step 5: Create pages and posts
The basics of your theme are now set. It is time to build your first pages and posts.
Create a homepage
There are multiple ways to build up your page. A long time ago, you would write a story with lots of text. Those times are gone. You want to impress your visitors with short, engaging texts and nice photos and icons.
Page builders are a fantastic way to achieve that. You create rows and columns, and then you drag photos, text, headings, or any other element inside those columns.
By default, WordPress has a basic page builder installed called Gutenberg. Premium themes often include more advanced page builders, such as Visual Composer or Elementor.
We have specific guides for Visual Composer and Elementor in case you bought a premium theme with those page builders pre-installed, but for now, we’ll assume that you will continue building your site with the default Page Builder provided by WordPress: Gutenberg.
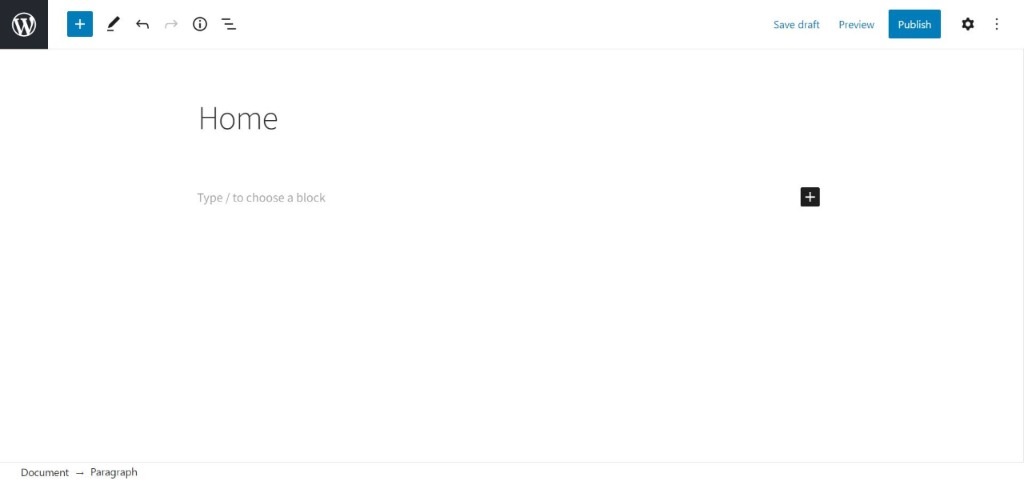
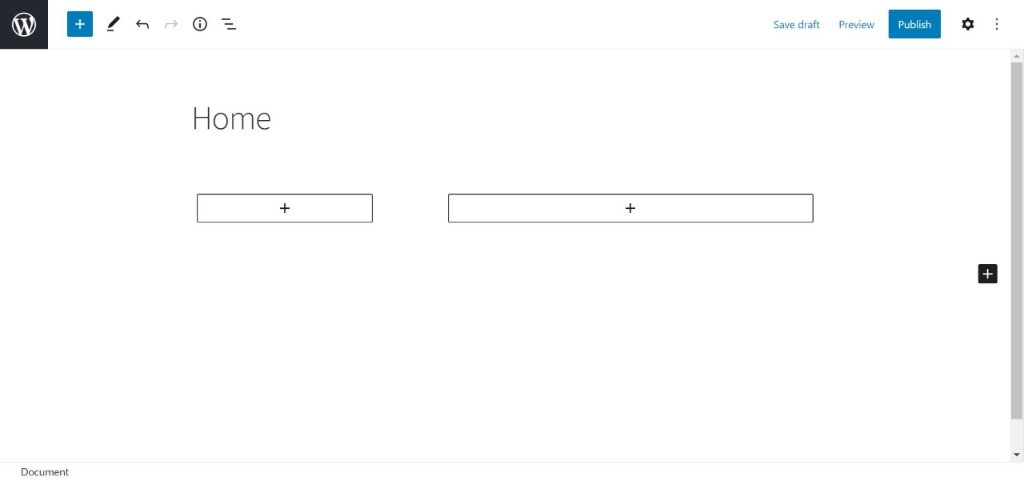
Go to Pages in the side menu, and delete the Sample Page by hovering it with your mouse and selecting Trash. Now, click ‘Add New’ and call your page Home.
Before we add any content, let’s look at the sidebar on the right side. If this is not visible to you, click the Cog icon next to the Publish button. The sidebar shows the default settings for your post. You can save a page as a draft (useful if it is still a concept), schedule a page in advance, change the URL for the page (called the permalink), or add a highlighted (featured) image that is sometimes used across WordPress. Some themes might add other options here as well.
For now, everything looks fine. It is time to build up your page.
Under the title, you’ll see the drag-and-drop page builder. You can write text straight away, but you can also add blocks. Write a / to get a list with block options. You can add, among others, a title, image, list, or quote. You can also filter the options by writing a few letters (eg: writing ga shows a Gallery block). You can view all available options by clicking the blue + icon at the top left. Try it out and find the Columns block. Click on it (or drag and drop it into the canvas) and it will appear on your page. Choose the 30/70 option, which means you will get one column with 30% width and a second one with 70% width.
In the builder, it should now look like this:
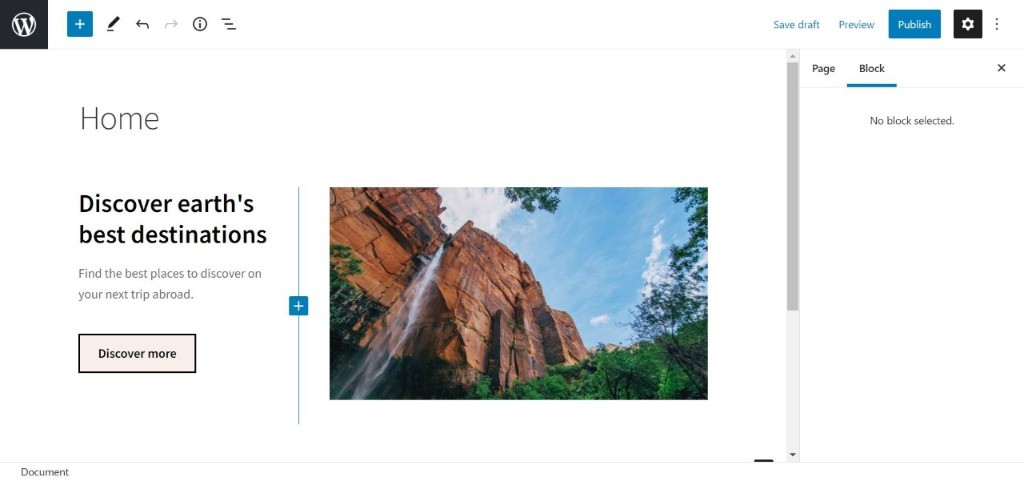
In each of these columns, we can add new blocks. Click on the plus icon and add a Heading, Paragraph, and Button to the left column and an image to the right column. You can change block options by selecting the block and using the icons that appear above the block and on the right side. If these options are not visible, make sure that the black Cog icon at the top right, next to the Publish button, is selected.
Your page should now look similar to this:
Remember that your page could look slightly different because of your selected theme. For example, some themes give your buttons rounded corners by default. If you don’t like this, you can go to your theme options and see if there is a way to change this setting (or use the Radius option at the right side).
Now, add a new row below the one you just created by clicking the Plus icon and selecting ‘Query Loop’. This is a loop block that will show your future posts one by one. We’ll come back to this block later for a couple of changes.
Your first page is now ready to be published. Hit the blue Publish button at the top right and confirm.
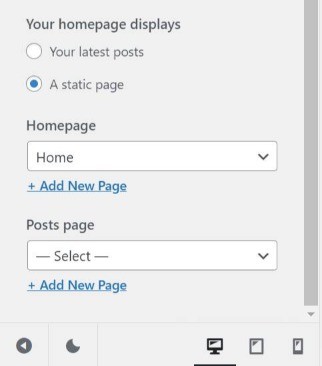
Great, you have just published your first page! However, we have to apply a one-time setting to WordPress. We need to tell the system what your default homepage will be so users will see it when they end up on your website.
In your admin area, go to Appearance -> Customize. Under ‘Homepage Settings’, select ‘A static page’. Then under ‘Homepage’, select the page that you just built.
Create a post
Now it is time to create a post. In your admin menu, go to Posts. You will see a default post called ‘Hello world!’ You can delete it. Click Add New and use the editor to write your own post.
You can keep your post simple by just writing texts and adding pictures, but you can go all way and give it a fancy design too.
You can categorize posts in the sidebar (under the ‘Post’ tab) by thinking ahead about common post categories on your website, creating a new category, and then selecting that one. We also recommend setting a featured image. Then, click Publish and confirm.
Now, visit your homepage and see what it all looks like. Your published post is visible within the Query Loop block on the homepage. Edit your Home page and play around with the Query Loop settings to make it look like the way you want.
Keep iterating on the design of your page. Play around with the global theme options too. You’ll see that there are lots of different ways to design your website. Think back to the branding and color palette that you defined in the previous step.
Can’t you build something you like? Consider switching themes to get different design constraints and customization options.
Set up your menu
The last thing we have to do is to create the menu. Go to Appearance -> Menus. Give a clear name to your menu, such as Main Menu. You can reorder the pages that are already filled in the list, or you can add new pages by selecting them at the left and then clicking ‘Add to Menu’. Finally, save your menu using the blue button.
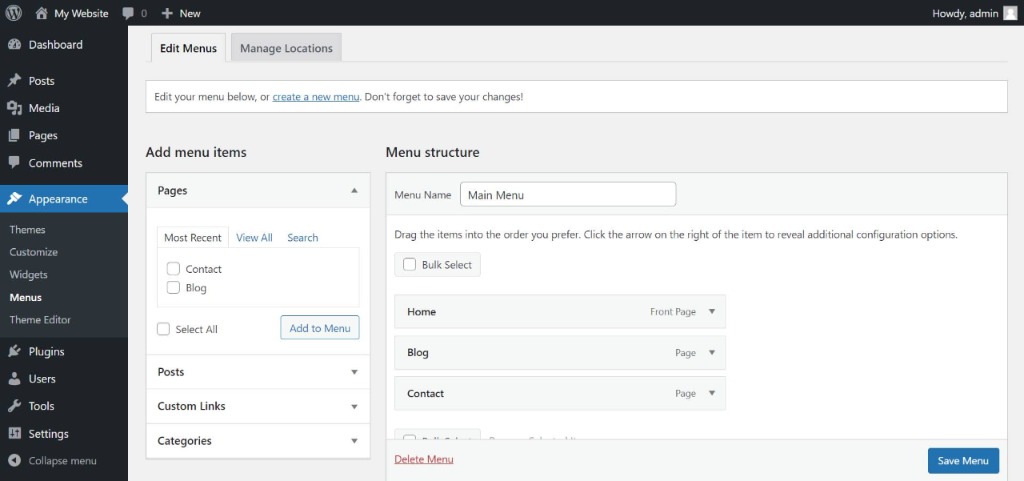
Now, click on the Manage Locations tab at the top. Assign your Main Menu to one of the locations provided by the theme (it is probably called ‘Primary navigation’, ‘Header menu’, or similar). Click on ‘Save Changes’.
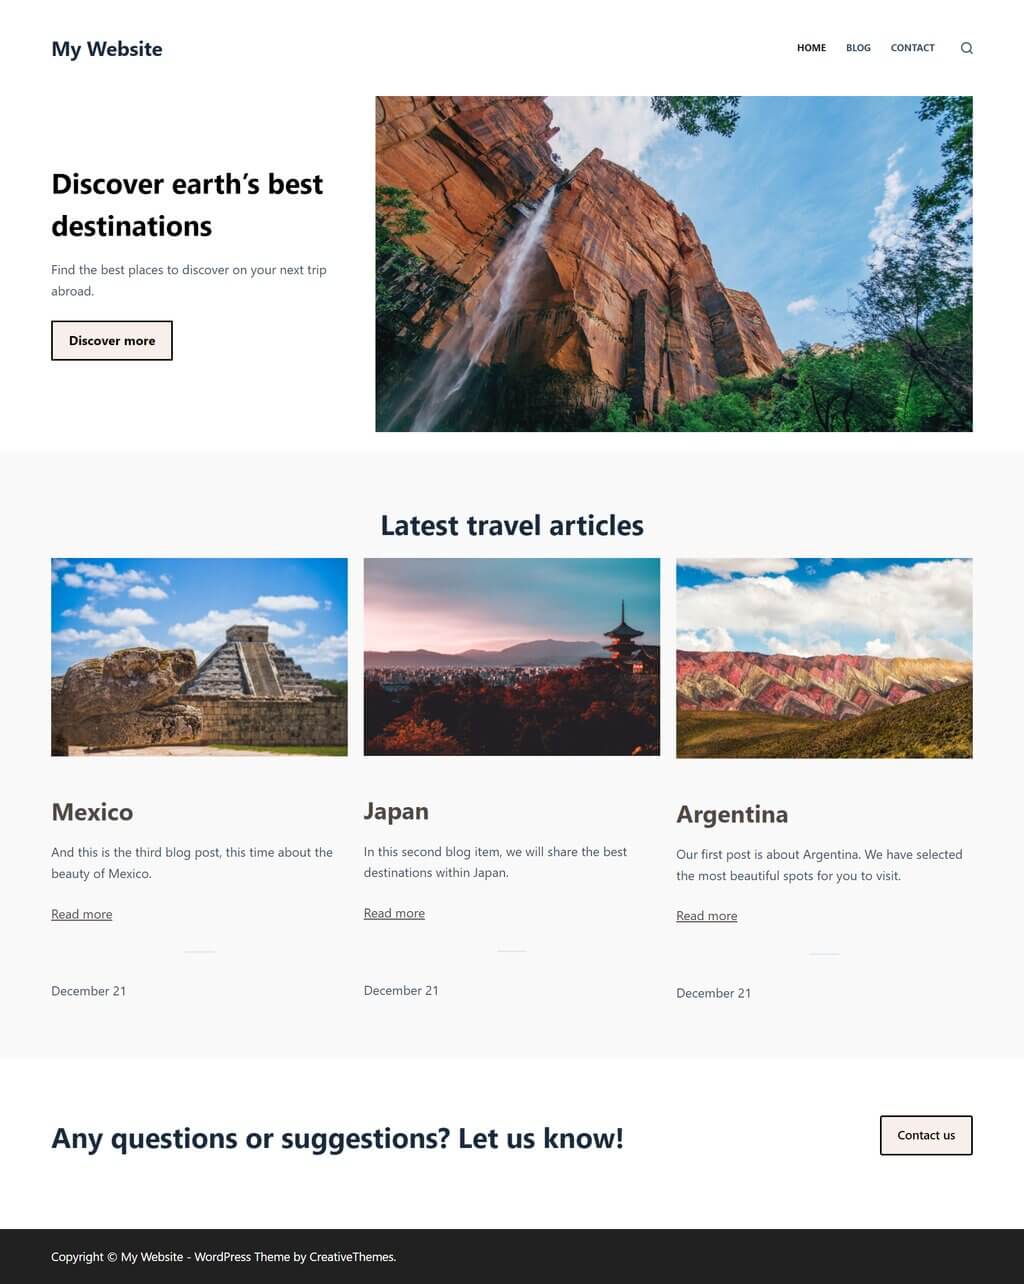
Amazing, that’s it! We have created a website with pages, a nice menu, and posts.
Below is an example of what your website could look like. We used the free Blocksy theme, the default Gutenberg page builder, and a couple of free stock photos, and we made a few changes to the theme’s customization options.
Spend time building the other pages of your website as well. In step 3, you might have sketched out a few pages already. Now it is time to make them come alive. After you have finished building a page, don’t forget to add it to your main menu.
Step 6: Improve your website with essential plugins
WordPress has an incredible amount of plugins available. Plugins are extensions to your site and will add functionality that is not by default part of the WordPress core.
Do you want to install some plugins? Go to Plugins in the sidebar. Now, click on ‘Add New’. This brings you to a library of free WordPress plugins. There are over 55,000 available. Here are a few of our recommendations.
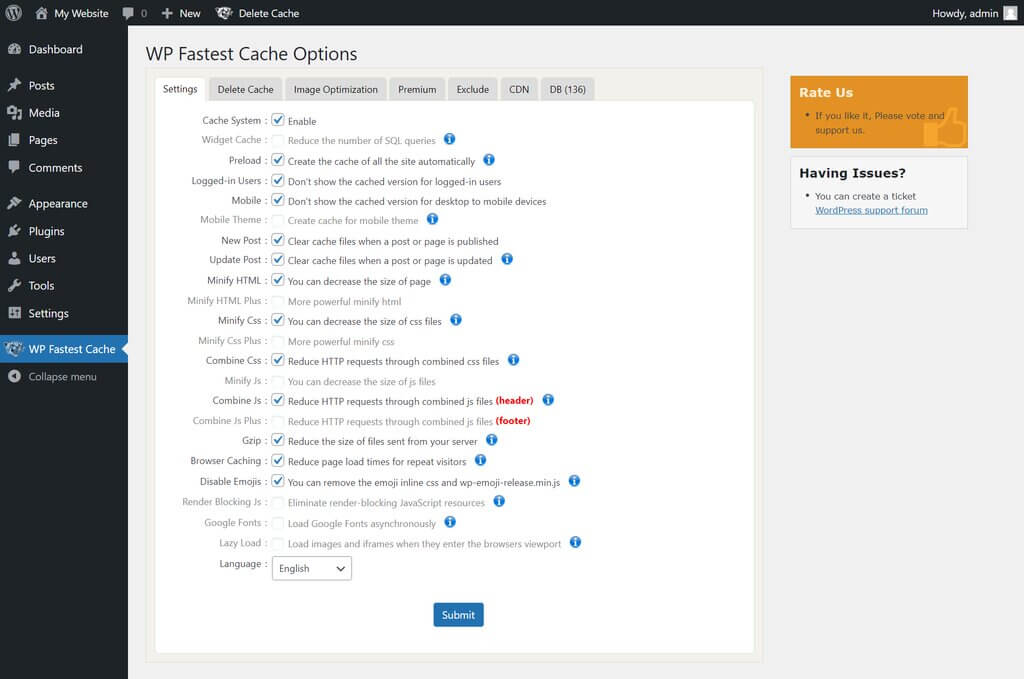
WP Fastest Cache
This plugin makes your website load much faster by using a ‘caching system’. Usually, every time a visitor navigates to a page on your website, your server will check for updates and build up your page dynamically from scratch. With caching, this dynamic version will be generated only once. A static (and much lighter) version is shown to every visitor afterward, without the server needing to check for updates. After you make changes to your site, it automatically regenerates the static page once.
Long story short: it improves your website speed with a few ‘behind-the-scenes’ tricks.
In the plugin directory, search for ‘WP Fastest Cache’. Install and activate the plugin. In your sidebar, a new menu item is visible. Click on ‘WP Fastest Cache’. On the Settings tab, enable every checkbox. After clicking the Preload checkbox, a popup will appear. You can select all checkboxes again and set the pages per minute to 4. Click Ok, continue, and click ‘Submit’. That’s it!
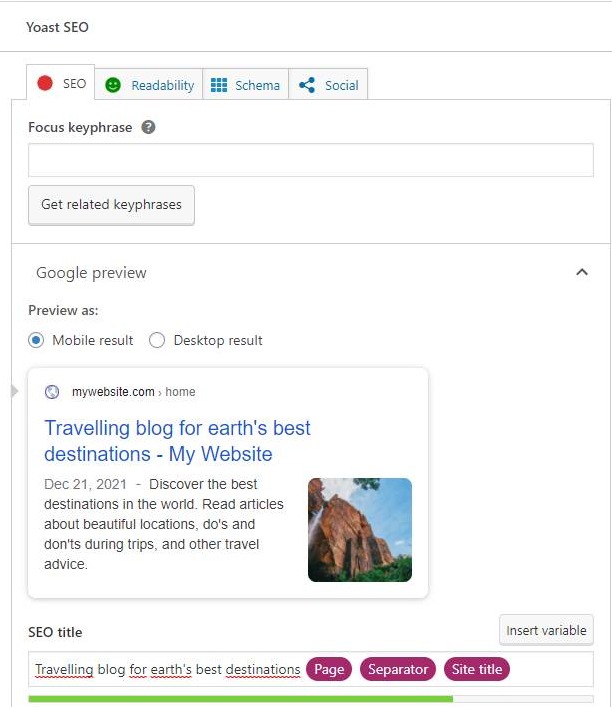
Yoast
Search Engine Optimization (SEO) is important for every website. With a few easy steps, you can increase your performance in the famous Google rankings. Yoast is a free plugin that helps you to set up your site for better results.
In the plugin directory, search for ‘Yoast SEO’. Install and activate the plugin. In your sidebar, a new menu item is visible. Click on ‘Yoast SEO’. This is the panel from which you can set up Yoast. There is a notification at the top for a ‘First-time SEO configuration’. Click the link and walk through the steps.
Yoast’s plugin will add new options to your website. From now on, if you edit a page or post, you will note that there is a new section visible at the bottom. Here, you can write custom titles and descriptions for each page. This is what search engines will show if your site ends up in the search results.
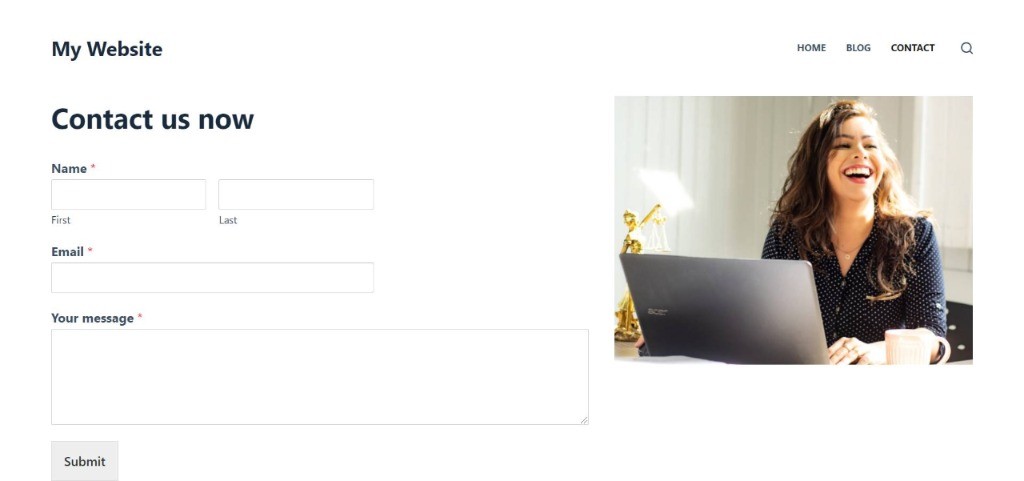
WP Forms
Forms are a great addition to any website. You can build contact forms so people can reach out to you, but you can also create forms for people to leave their contact details behind or to let them subscribe to newsletters. With WP Forms, we have a great and free contact form solution.
Again, go to the plugin library and search for ‘WP Forms’. Install and activate the plugin.
Follow the steps provided by the plugin to create your first form. There are simple templates to start with. WP Forms integrates automatically with Gutenberg and other page builders. Edit one of your pages and search for the WP Forms block. Add it to your page. Then, select your form and save the page.
Step 7: Share your website with the world
You’ve now created your own WordPress website! It is ready to be shared with the world. It might be far from finished, but you can update your website at any time. Moreover, putting your website online for visitors can already get you some initial feedback.
First, we have to make sure that your website can actually be accessed by search engines. In your admin panel, go to Settings -> Reading, and make sure that the checkbox before ‘Discourage search engines from indexing this site‘ is NOT checked. Click ‘Save Changes’. Now, search engines are allowed to show your website in their results.
This is the time to share your URL with others. Send it to friends and family, harness the power of social media (LinkedIn, Twitter, Facebook, Instagram), or submit your URL to online directories. Let the world know about your website and let the feedback come to you.
If you are looking for specific design feedback, you can also engage in online communities and ask for feedback. For example, reddit.com has a nice subforum to request design critiques.
Step 8: Keep on improving
A website is never finished. You should regularly update content, write news- or blog articles, or revise photos. The goal is not to update your site as often as possible; the goal is to make it a useful resource for your target audience so there is value for them to come back.
Don’t try to make your website as big or extensive as possible. Talk with your (potential) audience instead and find out what they like and don’t like about your website or about competitive websites. Adjust your site based on their insights.
Over time, more and more visitors will find your website. Make sure to keep your website updated to the latest software versions so it stays secure, and check from time to time if everything still works as expected.
It is amazing that you’ve come this far. That is a great and exceptional achievement, really.
This is not the end of your journey (ideally, it is just the beginning). You can always come back to this site to find other tips and tricks to improve any part of your WordPress website.
Conclusion
You’ve created your own WordPress website! We started from the very beginning and ended with a fully-functioning website. First, you decided on a domain name and hosting provider. Then you installed WordPress, crafted a plan for your website, and chose a theme.
After these steps of preparation, you optimized your theme and built pages and posts. Finally, your website was improved with a few essential and useful plugins. Now it is ready to be shared with the world. Don’t forget to ask around for feedback on your site. Keep your eyes and ears open and use insights to improve your website and build new content.
Congratulations on your brand-new, professional WordPress website! 🎉