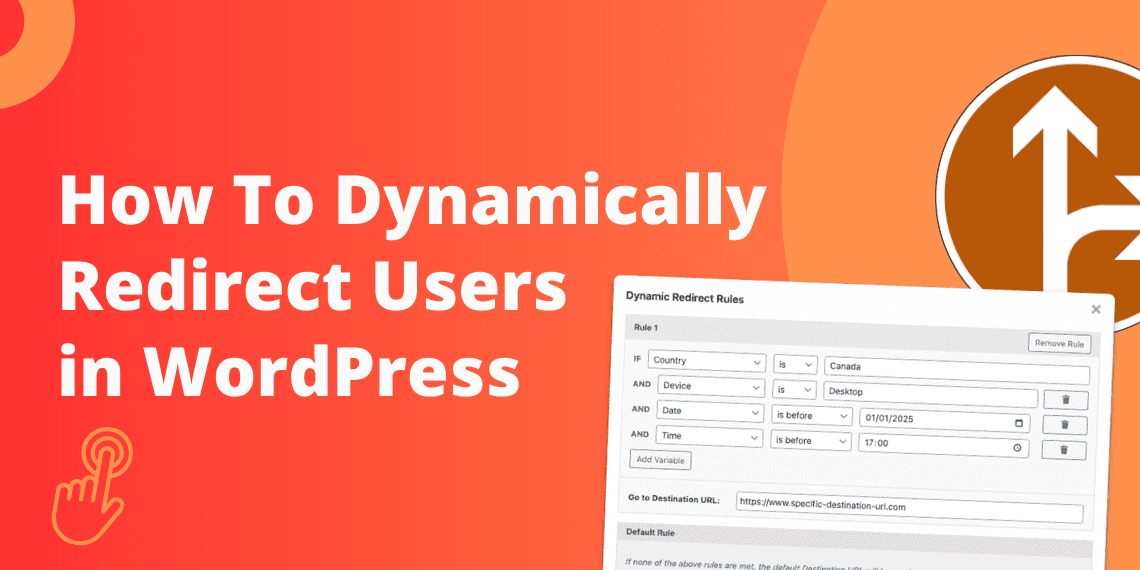
If you’re managing affiliate links, running multi-channel campaigns, or building a content strategy, dynamic user redirects are one of the most powerful tools you can add to your WordPress site. Instead of sending every visitor to the same destination, “Dynamic Link Redirects” route users automatically based on their location, device, referrer, login status, or other custom rules.
In this guide, we’ll quickly cover which plugins support these dynamic redirects, then walk through exactly how to set them up using LinkCentral, one of the best options for rule-based redirect logic in WordPress.
Which WordPress plugins support Dynamic Redirects?
Several link management plugins exist for WordPress, each with a different focus. Here’s a quick overview of where they stand on dynamic redirect support.
| Feature | LinkCentral | Pretty Links | ThirstyAffiliates | BetterLinks |
|---|---|---|---|---|
| Geolocation | ✅ | ✅ | ✅ | ✅ |
| Device | ✅ | ✅ | ❌ | ✅ |
| Time | ✅ | ❌ | ❌ | ✅ |
| Date | ✅ | ✅ | ❌ | ✅ |
| Browser | ❌ | ✅ | ❌ | ❌ |
| Operating System | ✅ | ✅ | ❌ | ❌ |
| Logged-in Status | ✅ | ❌ | ❌ | ❌ |
| User role | ✅ | ❌ | ❌ | ❌ |
| Cookie | ✅ | ❌ | ❌ | ❌ |
| Total Clicks | ✅ | ❌ | ❌ | ❌ |
| Unique Clicks | ✅ | ❌ | ❌ | ❌ |
| URL Parameters | ✅ | ❌ | ❌ | ❌ |
| Conditional rule builder | ✅ | ❌ | ❌ | ❌ |
| Price (yearly) | $49.99 » More | $99.60 » More | $99.60 » More | $79.00 » More |
LinkCentral is the only plugin in this group with a visual rule builder that supports a wide range of condition types, such as geolocation, device, user role, cookies, URL parameters, and multi-rule logic. It also has support for comparison operators such as “is”, “is not”, “starts with”, and more.
Pretty Links is a long-standing favourite for link cloaking and URL shortening. Its Pro version adds percentage-based traffic splitting and a few extra conditional rules, such as geolocation and device.
ThirstyAffiliates is purpose-built for affiliate marketers and includes a geo-redirect add-on for country-based routing. It is useful and supports uncloaked links, but is limited to location as the only dynamic condition.
BetterLinks brings a clean modern interface and solid team-based link management with A/B testing, but offers only 4 conditional redirect rules beyond traffic splitting.
All four plugins require the Premium or Pro version. LinkCentral is the cheapest option, currently priced at $49.99 a year (there is also a lifetime deal available).
For the rest of this guide, we’ll focus on LinkCentral and walk through how to set up dynamic redirects from scratch.
How to create dynamic routing rules in WordPress with LinkCentral
Step 1: Install and activate
From your WordPress dashboard, go to Plugins → Add Plugin, and upload the LinkCentral Premium plugin, then Activate. Once active, a LinkCentral menu item will appear in your sidebar.
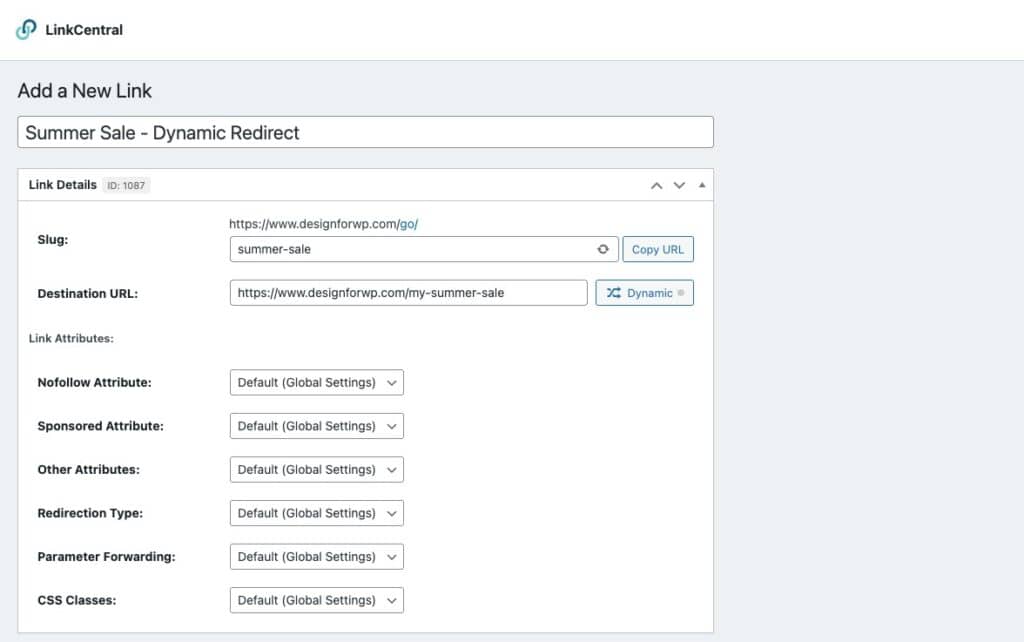
Step 2: Create a new managed link
- Navigate to LinkCentral → Add New Link.
- Give your link a descriptive name (e.g., “Summer Sale – Dynamic Redirect”).
- Set a slug for your cloaked URL (e.g.,
go/summer-sale). - Enter your default destination URL — this is the fallback used when no redirect rules match a visitor.
Think of the default URL as your safety net. Any visitor who doesn’t meet any of your dynamic conditions will land here.
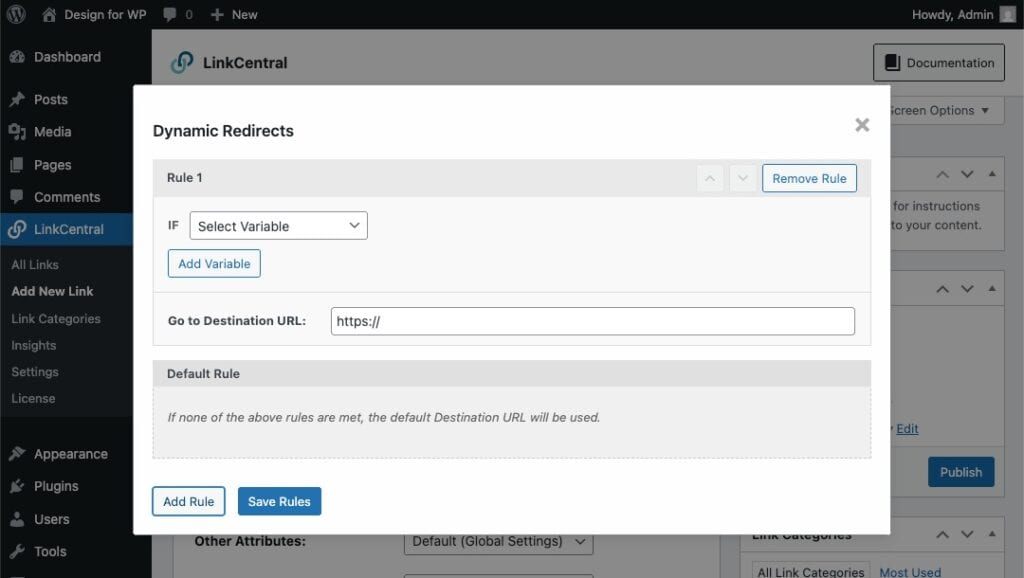
Step 3: Add your first redirect rule
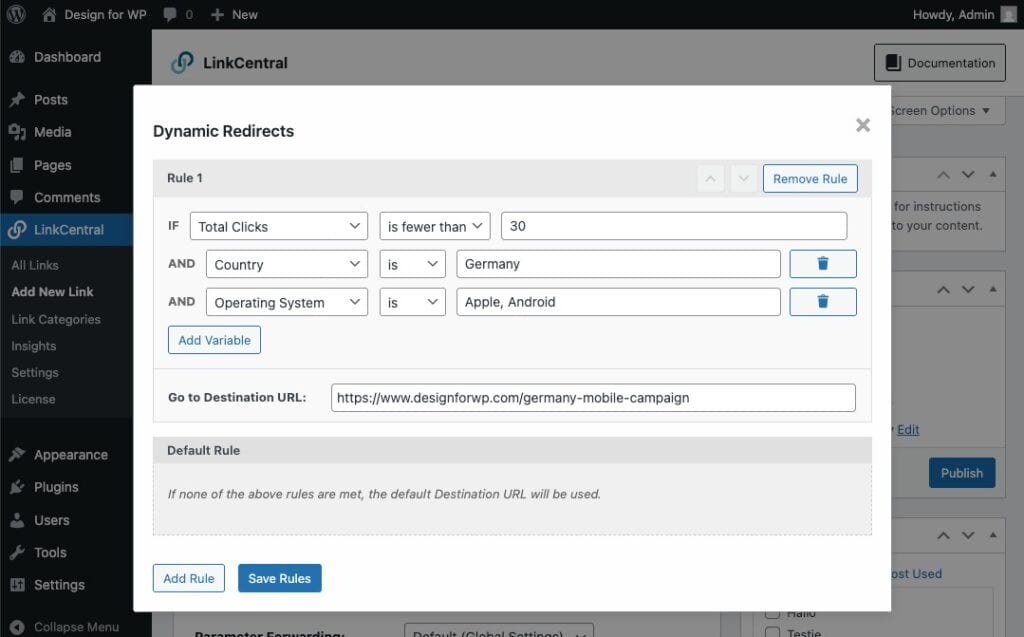
In the link editor, click the Dynamic button and click Add Rule. Each rule has two parts:
- A condition — the criteria you want to match (e.g., “Device is Mobile”)
- A destination URL — where to send visitors who meet that condition
Rules are evaluated top to bottom. The first match wins, so order matters. You can drag rules to reorder them at any time, and add more as needed.
Step 4: Redirect by Geolocation
Sending visitors from different countries to localised landing pages or region-specific affiliate offers is one of the most common dynamic redirect use cases.
- Click Add Rule and set the condition to Country.
- Choose your target country from the dropdown (e.g., United Kingdom).
- Enter the destination URL for visitors from that country (e.g., a
.co.ukaffiliate link). - Save, then repeat for any additional countries you want to target.
Any visitor whose IP resolves to a matched country gets routed to the corresponding URL. Everyone else continues to the default.
💡 One great example specifically for affiliate marketers is to forward customers to a local webshop. For example, if you are promoting a product, you could redirect users from the United Kingdom to Amazon.co.uk, while US-based visitors go to Walmart.com and Dutch customers to Bol.com.
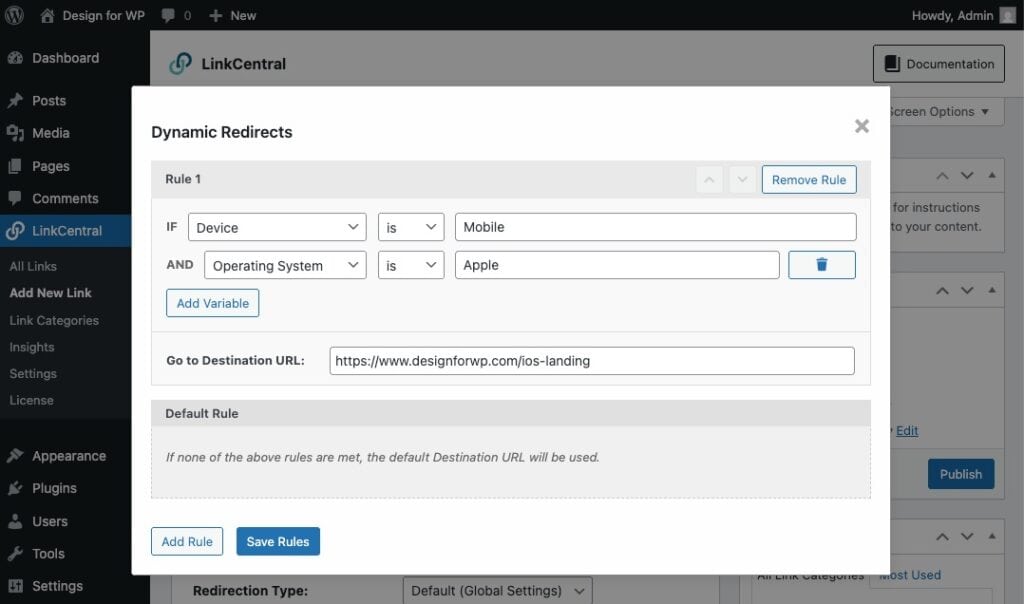
Step 5: Redirect by Device Type or Operating System
Mobile users often convert better on streamlined pages, while desktop users prefer more detailed content. Routing them to different destinations is easy with LinkCentral.
- Click Add Rule and set the condition to Device.
- Choose Mobile (or Tablet if you want separate handling).
- Enter the mobile-optimised destination URL.
- Drag this rule above your geo-rules if mobile detection should take priority.
This is one of the highest-impact redirect rules you can implement, particularly for affiliate marketers promoting apps or mobile-first products.
You can even extend your rule with an AND operator to also target a specific operating system, such as Android or Apple, or combine it with Geolocation. Remember rules are evaluated top to bottom.
Step 6: Redirect by User Role
If you run a membership site, online course, or any site with WordPress user accounts, role-based redirects make it easy to personalise the experience for different audience segments.
- Click Add Rule and set the condition to Logged In Status.
- Select the role you want to target (e.g., Subscriber, Member, or Administrator).
- Enter the destination URL for users with that role.
A practical example: visitors who click a “Get Access” link get sent to your sales page, while logged-in members with the right role go directly to the content.
Step 7: Redirect by Date, Time, or Clicks
Redirects based on date, time or clicks let you customise the landing experience based on when or how often a visitor opens your link. This is particularly powerful for email campaigns, paid ads, and giveaways.
Example: You’re running a Facebook ad campaign and between two dates, you want to alternate users who click on a link between two destinations to find out which one performs better.
Step 8: Combine conditions with multi-rule logic
LinkCentral’s rule builder supports combining multiple conditions within a single rule (e.g., “Device is Mobile AND Country is Germany”).
This lets you build multi-layered redirect logic that would normally require custom middleware or developer time.
Step 9: Track performance with built-in analytics
Dynamic redirects are most valuable when paired with data. LinkCentral tracks every click and breaks it down by:
- Date and time
- Device type
- Geographic location
- Referrer source
- If a redirect rule was triggered
Navigate to LinkCentral → Insights and you’ll see exactly which links are clicked and where users were routed to.
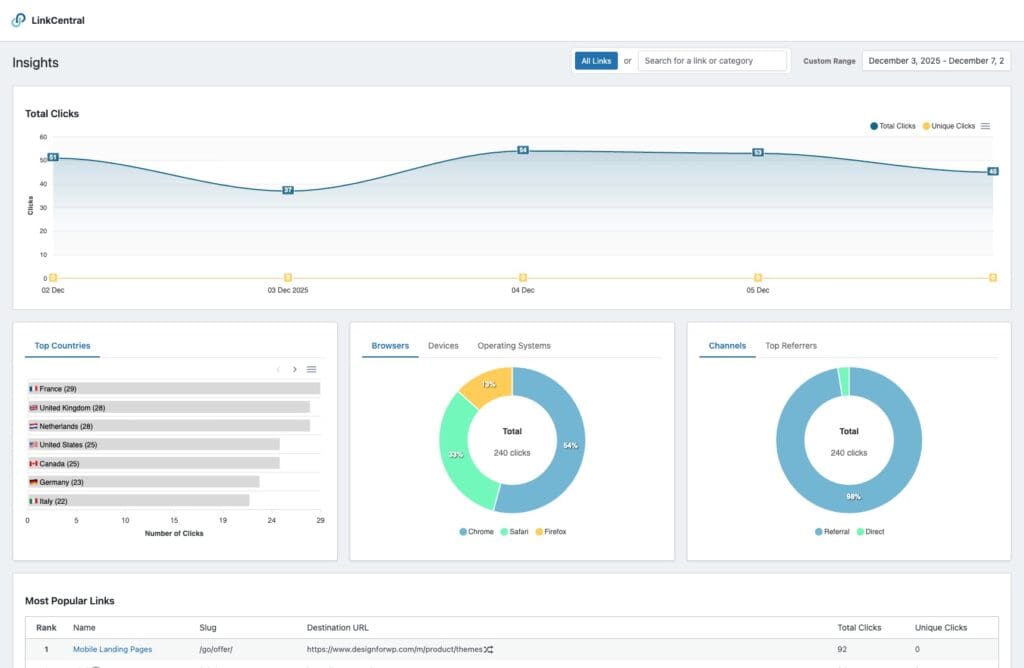
Use this to refine your rules over time: if a particular country or device type is driving unexpectedly high traffic, it may be worth investing more in that segment’s landing experience.
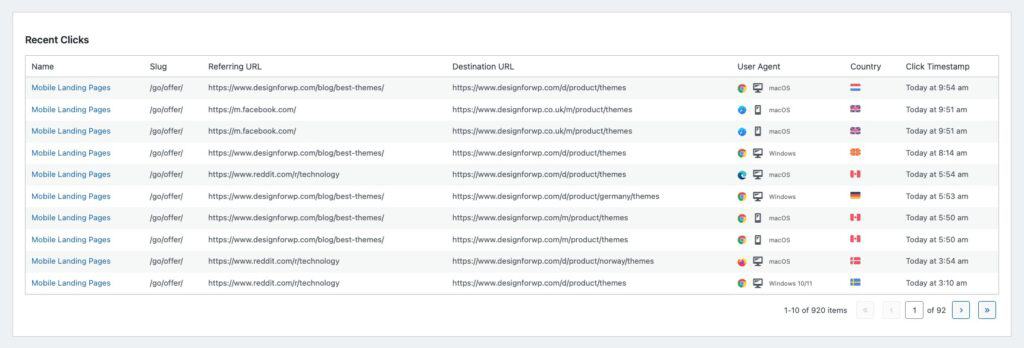
Under the Recent Clicks table, you can also see all clicks appearing in real time as they happen.
Advanced use cases
Once you’re comfortable with the basics, there’s a lot more you can do with LinkCentral’s dynamic redirect system.
Seasonal campaigns: Schedule links to point to a time-limited offer (e.g., a Black Friday sale page), then automatically revert to the default URL once the campaign ends without manual updates.
A/B testing with conditions: Combine split testing with other conditions to test landing pages specifically among mobile users, or among visitors from a particular country, for more meaningful results.
Cookie-based retargeting: Use cookie conditions to detect whether a visitor has already clicked a short link before (LinkCentral can set a cookie once a link is clicked). First-time visitors could land on an introductory offer page, while returning visitors skip straight to checkout or a loyalty-specific deal.
Click-cap redirects: When a link reaches a defined limit of total or unique clicks, for example during a limited giveaway with 100 spots, automatically send additional visitors to a “sold out” or waitlist page instead of leaving them on an expired or unavailable offer.
💡 A practical example of a click-cap redirect is a redirect after a form submission. Imagine running a giveaway where users enter their email through FluentForms or WPForms. Set the post-submission redirect to your LinkCentral URL, then apply a click cap to that link. Once the limit is reached, new submissions are seamlessly redirected to a waitlist or closed-offer page.

Conclusion
Dynamic redirects in WordPress are a powerful way to get the right visitor to the right place at the right time. With the visual rule builder in LinkCentral, it is easy to route them based on geolocation, device type, user role, cookie, and many more.
Frequently Asked Questions
LinkCentral uses 302 (temporary) redirects by default for cloaked links, which don’t pass link equity. This is generally the preferred approach for affiliate links. You can easily switch to 301 for permanent redirects where appropriate.
LinkCentral uses IP-based geolocation and lets you choose between Cloudflare and MaxMind (both free). This is reliable for the vast majority of real traffic, but VPN users may occasionally appear to be in a different country.
Yes. It integrates well alongside WooCommerce and is particularly useful for managing affiliate links to external products and routing customers based on their account role.